Html.actionlink Based on Select Item List Back to Controller
- Download ManyToManyMVC5.zip - 544.9 KB
27th October 2014 Article of Day on www.asp.net
Introduction
There are a lot of articles about ASP.NET MVC and Model Binder. I didn't find any real-world article about Model Binder of Many To Many relation. So I decided to write this post and share my experience on this topic. Although I will explain easily and step by step my approach, readers of this article should have as prerequisite the knowledge of basic concepts in ASP.NET MVC as Controller, View, Model, Model Binder and Scaffolding.
Background
In this post I will use ASP.NET MVC 5, Entity Framework 6.1.1 and Visual Studio 2012. To add MVC 5 support in VS2012 you have to check this link : ASP.NET and Web Tools 2013.1 for Visual Studio 2012. You can add Entity Framework 6.1.1 through NuGet. My approach should be not the best, but it works well.
Many to Many Entity Model generation
My sample comes from a real-world application, a Web Job Portal for Employers and Job Seekers. In my sample I will use Database first approach. With Entity Framework we can start our project also with First Model Approach designing the Model of our entities and after generating the database schema using Entity Framework tool. I will not add more because this is not the topic of the post. Let's carry on. We have the following database diagram
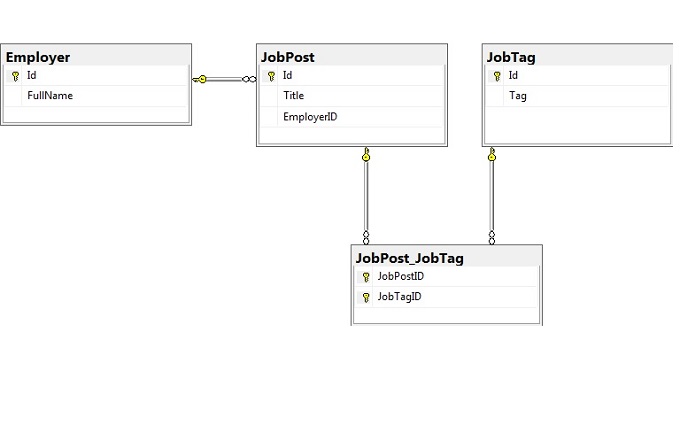
JobPost contains the job announce posted from Employer. Moreover the Employer can add to a JobPost many JobTag. In the database those two tables are related to each other via a link or junction table, JobPost_JobTag without payload. This table just contains the foreign keys used to link the two tables together into a many-to-many relationship. We create a new ASP.NET MVC5 web project named ManyToManyMVC5

Now we have to add Entity Framework 6.1.1 from NuGet. We are ready to create a model and import these tables and relationship in onr project.
Add a new model to the project by right-clicking your Models folder and selecting Add>New>ADO.NET Entity Data Model.
- Specify as name for item "JobPortal"
- Select the option Generate from Database
- Use the wizard to create your database connection or connect to an existing one. Let "JobPortalEntities" as the name for the connection string of the Web.Config file ( the option on the buttom )
- Select the 3 tables to add to the model : Employer, JobPortal, JobTag and JobPortal_JobTag. Check the option "Pluralize or Singularize generated object names" and let other settings as default.
Now you see the Entity Diagram of the generated model

Note that we have the one-to-many relationship between Employer and JobPost, and the many-to-many relationship between JobPost and JobTag. Note that the link table JobPost_JobTag is not represented as an entity in our mode. This is because our link table it has no payload ( that is it has no scalar property ). If we had a payload, we shouldn't have the many to many relationship but we should have a fourth entity with one-to-many relationship to JobPost and one to JobTag. Let's carry on. In the Models folder we have JobPortal.edmx file, that is the phisical representation for our model. We can expand it and expand JobPortal.tt. We see that the last contains our .cs files for the entitites we generated. Take a look to JobPost.cs and JobTag.cs
public partial class JobPost { public JobPost() { this.JobTags = new HashSet<JobTag>(); } public int Id { get; set; } public string Title { get; set; } public int EmployerID { get; set; } public virtual Employer Employer { get; set; } public virtual ICollection<JobTag> JobTags { get; set; } } public partial class JobTag { public JobTag() { this.JobPosts = new HashSet<JobPost>(); } public int Id { get; set; } public string Tag { get; set; } public virtual ICollection<JobPost> JobPosts { get; set; } }
Note that the two entities have a ICollection property to each other.
ASP.NET MVC5 and Many to Many relationship
Surfing internet you will find many interesting articles and posts on Model View Controller ASP.NET pattern and how it is easy to create MVC projects. But in the real-world the things are different and we have to enhance our approach.
In ASP.NET MVC we can use Scaffolding to quickly generating a basic outline of our application that we can edit and customize. So we can create automatically controllers and strong-typed view to perform basic CRUDL operations on our entities. Unfortunately ASP.NET MVC scaffolding doesn't handle many to many relationship. I think that the main reason is that there are too many kinds of many-to-many user interface creating/editing.
Another issue is concerning the automatic ASP.NET MVC Model Binding. As we know, model binding allows you to map HTTP request data with a model. Model binding makes it easy for you to work with form data because the request data (POST/GET) is automatically transferred into a data model you specify. ASP.NET MVC accomplishes this behind the scenes with the help of Default Binder. If we have a Many to Many relationship in the user interface we will have some kind of interface that allow user to perform multiple choice. So we need a complex type in our view to bind the selected items, as a Check Box Group or List, or a Multiple List Box. But let see the issues in action .
We will use Scaffolding to generate a basic controller with Entity Framework based CRUDL method and the related Views. Right click on Controlers foder and choise Add>Controller. In the Add Scaffold choise "MVC5 Controller with views, using Entity Framework". Set the next form as the below picture and click on Add

Note: If you get an error message that says "There was an error getting the type...", make sure that you built the Visual Studio project after you added the class. The scaffolding uses reflection to find the class.
MVC5 Scaffolding will generate in the Controllers folder a file JobPostController.cs and in the Views folder in the JobPost subfolder the views for the related CRUDL methods. Before run the application we have to modify the RouteConfig.cs located in App_Start setting as default controller JobPostController
public class RouteConfig { public static void RegisterRoutes(RouteCollection routes) { routes.IgnoreRoute(" {resource}.axd/{*pathInfo}"); routes.MapRoute( name: " Default", url: " {controller}/{action}/{id}", defaults: new { controller = " JobPost", action = " Index", id = UrlParameter.Optional } ); } }
Now you can run the application and browse the pages. It is amazing ...!! But .. we don't have any track about Many to Many relationship !!!
View Model Approach
To overcome these issues, my approach is based on ViewModel entity. View Model represents data you want to have displayed in your view. Easily is a class that represents data model used in a specific view. In our case our View Model contains the data of the JobPost, the data of all available JobTag and the data of the selected JobTag.
We start to modify the View Index ( it is associated to the Action index of the JobPostController ) and let it to show the list of the associated JobTag to a JobPost in a Listbox. So we add a row to the table in the index.cshtml.
// This row to the header table < th > @Html.DisplayNameFor(model => model.JobTags) < /th > // This row to the body table < td > @Html.ListBox("Id", new SelectList(item.JobTags,"Id","Tag")) < /td >
Now we can run the apps ... in the index you will see a ListBox with all Tags for the post. It was easy.
Next step is to modify the edit view. When user edit a job post, we desire to show a ListBox with the list of available the job tags where the selected are the ones associated to the job post. User can change the selection or other data and submit back to the controller to persist the data,
The first problem is to pass to the view the list of all available job tags. The second problem is to mark as selected the associated ones. Now comes in the Model View !!
In your solution create a folder named ViewModel and add to it a class file "JobViewMode.cs" with the code below
public class JobPostViewModel { public JobPost JobPost { get; set; } public IEnumerable<SelectListItem> AllJobTags { get; set; } private List<int> _selectedJobTags; public List<int> SelectedJobTags { get { if (_selectedJobTags == null) { _selectedJobTags = JobPost.JobTags.Select(m => m.Id).ToList(); } return _selectedJobTags; } set { _selectedJobTags = value; } } }
Our view model contains a property that store a JobPost, a property that store the JobTag associated to the stored JobPost as a List<int> of JobTag's Id, and finally a property that store all available JobTag as a IEnumerable fo SelectListItem ( to bind to a ListBox )
We modify the Action edit associated to the Get as below where we introduce the JobPostViewModel instead of JobPost
public ActionResult Edit(int? id) { if (id == null) { return new HttpStatusCodeResult(HttpStatusCode.BadRequest); } var jobPostViewModel = new JobPostViewModel { JobPost = _db.JobPosts.Include(i => i.JobTags).First(i => i.Id == id), }; if (jobPostViewModel.JobPost == null) return HttpNotFound(); var allJobTagsList = _db.JobTags.ToList(); jobPostViewModel.AllJobTags = allJobTagsList.Select(o => new SelectListItem { Text = o.Tag, Value = o.Id.ToString() }); ViewBag.EmployerID = new SelectList(db.Employers, " Id", " FullName", jobpostViewModel.JobPost.EmployerID); return View(jobpostViewModel); }
Note : As you modified because you have not already changed the view type model you will get an error from the retur View field. Ignore it. It will off after you will modify the related view
In the modified action method we use the JobPostView entity. We load the propertiy JobPost with the selected job post including the eager loading of JobTags entity, and the property AllJobTags with a ListIntem builded form the JobTags and return to the View the ViewModel instead of the Model. Now we can modify the View. We change the ModelBinder to ViewModelJobPost and all the property. We add the ListBox binding.
@model ManyToManyMVC5.ViewModels.JobPostViewModel @{ ViewBag.Title = "Edit"; } < h2 >Edit< /h2 > @using (Html.BeginForm()) { @Html.AntiForgeryToken() < div class =" form-horizontal" > < h4 >JobPost< /h4 > < hr / > @Html.ValidationSummary(true) @Html.HiddenFor(model => model.JobPost.Id) < div class =" form-group" > @Html.LabelFor(model => model.JobPost.Title, new { @class = "control-label col-md-2" }) < div class =" col-md-10" > @Html.EditorFor(model => model.JobPost.Title) @Html.ValidationMessageFor(model => model.JobPost.Title) < /div > < /div > < div class =" form-group" > @Html.LabelFor(model => model.JobPost.EmployerID, "EmployerID", new { @class = "control-label col-md-2" }) < div class =" col-md-10" > @Html.DropDownListFor(m => m.JobPost.EmployerID, (SelectList)ViewBag.EmployerID, Model.JobPost.Employer.Id); @Html.ValidationMessageFor(model => model.JobPost.EmployerID) < /div > < /div > < div class =" form-group" > @Html.LabelFor(model=>model.AllJobTags,"JobTag",new {@class="control-label col-md-2"}) < div class =" col-md-10" > @Html.ListBoxFor(m => m.SelectedJobTags, Model.AllJobTags) < /div > < /div > < div class =" form-group" > < div class =" col-md-offset-2 col-md-10" > < input type =" submit" value =" Save" class =" btn btn-default" / > < /div > < /div > < /div > } < div > @Html.ActionLink("Back to List", "Index") < /div > < script src =" ~/Scripts/jquery-2.1.1.min.js" > < / script > < script src =" ~/Scripts/jquery.validate.min.js" > < / script > < script src =" ~/Scripts/jquery.validate.unobtrusive.min.js" > < / script > We can select more than one JobTag by multiselecting, as in the below

After saved, below what we can see in out Index page

Let take a look on the mechanism that it's behind. From the Edit page, when we save a POST command is triggered as below

Note the the query string use the "JobPost.<FieldName>" and that we have multiple SelectedJobTag.
This is important to understand the mechanismo of the MVC autobinder. When we click on Save, the Action
public ActionResult Edit(<code><code>JobPostViewModel jobpostView)
from the controller JobStatus is called. MVC5, becuase its ModelBinder, will automatically map the value on the query string to the related property of the class JobPostViewModel injected in the Action. We could override this mechanism for a more complex ViewModel object using the [Bind] decorator with the Action. But this is could be a subject for a new article. I hope I gave you a first idea about what is behind the scene with binding in ASP.NET MVC.
Conclusion
ASP.NET MVC5 with its Scaffolding mechanism too often has huge limitation in real world application. In this article I tryed to explain you how to use ASP.NET MVC in real world with a simple example about the implementation of a Many to Many relationship.
The example is really a basic one, but I hope that you got the idea behind the Binder and the ViewModel, so you are ready to go alone to the next level starting to modify the "create" feature in the enclosed sample project.
People could think to use other mechanisms like PropertyBag/ViewBag instead of ViewModel for example to pass other data to the View. You will lose the AutoBind mechanism and it also is definetly not correct from the point of view of S.O.L.I.D. principles, TDD approach and Design Object Oriented in general.
Html.actionlink Based on Select Item List Back to Controller
Source: https://www.codeproject.com/Articles/702890/MVC-Entity-Framework-and-Many-to-Many-Relation
0 Response to "Html.actionlink Based on Select Item List Back to Controller"
Post a Comment